Tip: Using a Jigsaw Activity
A cooperative learning activity with roots in anti-racist and inclusive pedagogy.
One cooperative learning strategy that is widely used in English as a Second Language (ESL)/English for Speakers of Other Languages classrooms (ESOL) is the jigsaw technique. You may have heard of this technique, seen it done, or even used it, without being aware of its anti-racist and inclusive pedagogy origins.
The jigsaw classroom has a four-decade track record of successfully reducing racial conflict and increasing positive educational outcomes such as improved test performance, reduced absenteeism, and greater liking for school. Just as in a jigsaw puzzle, each piece — each student's part — is essential for the completion and full understanding of the final product. If each student's part is essential, then each student is essential; and that is precisely what makes this strategy so effective. More on the history here.
I think it’s fascinating that such a widely used strategy in K12 education was created to primarily give students the opportunity to develop a sense of expertise and ownership over their learning, and to encourage students to see the work they do in school as a cooperative, not competitive, endeavor.
Step 1: Small Groups Investigate
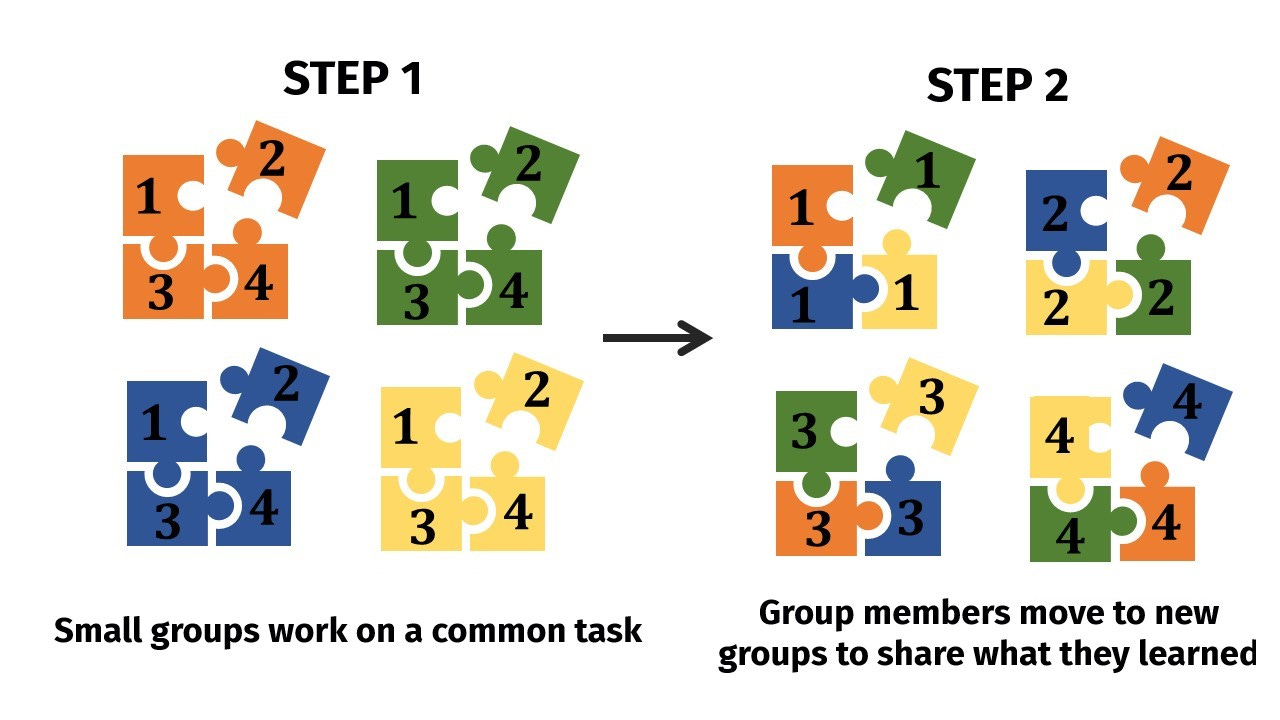
When using the Jigsaw activity, the first step is to get students into small groups and give them an investigation or exploration task. In this small group, the students need to work together to do something: research a topic, write a summary, create a list of procedures…this activity works with a variety of different types of tasks. The key is that each small group has a different topic to explore or task to complete - and each is a sub-task of a larger task or class objective. For example, if by the end of a class meeting you wanted every student to have notes about four different topics (ex: works of arts, strategies for writing an outline, chemical reactions, life cycles of four organisms), each group would explore a different topic, working to prepare a summary or list of the most important information about that topic.
Step 2: New Groups Share
Once the original groups have completed their task, the groups are reconfigured so that one student from each of the initial groups forms a new group. So for example, as you can see in the image below, if the orange group members spread out into the new groups each new group has one member from the old orange group. The key is that students from the initial groups are evenly distributed through the groups and step two. Once in the new groups, students take turns sharing what they uncovered in the first step of the jigsaw activity. That might mean orally retelling information, it might mean pointing the rest of the group to the specific sections in the textbook where the pertinent information can be found, it might be adding the information from an outline created with the Step 1 group to a new group outline created in Step 2. There are many different sharing information tasks that you might ask students to do in Step 2 of the jigsaw. The main goal is that students first become experts in each of the different subtopics, and then are asked to share that knowledge with their new group mates.
I would love to hear about how you’ve used a jigsaw or other cooperative learning activity with students in your courses!
For more reading…
Great Idea: Jigsaw Activities in English language learner classrooms
Some science applications from the National Association of Geoscience Teachers (NAGT) and the National Science Teaching Association


